Segmentation Software Usability and Performance: Part I
A Brief Comparison of Popular Cell Segmentation Software
Welcome back! I hope that you were able to come up with an amazing illumination correction pipeline from my illumination correction blog post and are ready for segmentation! If you are just starting with this blog post, then welcome in!
As a reminder from my previous post, keep in mind that any method or software you use in your pipeline might not be optimal or might not contain the functionalities that you want (e.g. model training, etc.). I recommend benchmarking different methods with your own data.
I will be comparing multiple segmentation methods in this blog post, which are:
-
CellProfiler
-
Cellpose
-
Cellpose plugin for CellProfiler
I also tested Ilastik, Weka Trainable Segmentation, and Scikit testing. From my experience, these performed sub-optimally with my data. I will discuss these methods in part II of my segmentation blog.
Note: My segmentation findings in this blog are based on Cell Painting data. For more information on Cell Painting assays and what makes them unique, see the following GitHub wiki from the Broad Institute.
CellProfiler
CellProfiler might have been difficult to work with for illumination correction, but CellProfiler excels in segmentation. The standard segmentation pipeline for Cell Painting images with CellProfiler is as follows:
-
IdentifyPrimaryObjects: Segment nuclei from a DAPI/Hoechst channel -
IdentifySecondaryObjects: Segment whole cells using an RNA channel -
IdentifyTertiaryObjects: Segment cytoplasm by subtracting the nuclei from the whole cell outline
Identifying primary objects (nuclei)
Starting with the IdentifyPrimaryObjects module, our goal is to identify the nuclei in the DAPI or Hoechst images. When first applying the pipeline, this module does not show the “advanced settings”, which makes it more approachable. The only parameters you need to set are the minimum and maximum diameters of the objects, which is easy to do. Following the steps in this tutorial video, a user can easily approximate the pixel size of the nuclei in an image.
But, just changing this individual parameter does not work for every dataset.
So, it is more optimal to select yes and change parameters within the advanced settings (yay… more prototyping…).
BUT!
And I mean but!
I found that the manual parameters in this segmentation module were very easy to work with.
You can see the impact of each parameter through the Test Mode feature.
I will be honest; IdentifyPrimaryObjects is the second easiest part of the whole segmentation pipeline. Nuclei are very easy to segment and there are not many necessary parameter changes other than setting the maximum and minimum diameter of the nuclei.
Identifying secondary objects (cells)
In contrast, IdentifySecondaryObjects was the hardest of the three steps. This was because in our data (we’re working with Schwann cells), the actin from the RFP channel (used for segmenting the whole cell), is very long and stringy. The atypical shape of Schwann cell actin makes it harder for CellProfiler to segment each cell (see figures below).
In this module, I changed many parameters to optimize segmentation. For my data, the most important parameters are:
-
Method to identify secondary objects
-
Thresholding method
-
Threshold correction factor
For example, the method that you choose for identifying secondary objects can make a dramatic difference in segmentation (Figure 1).
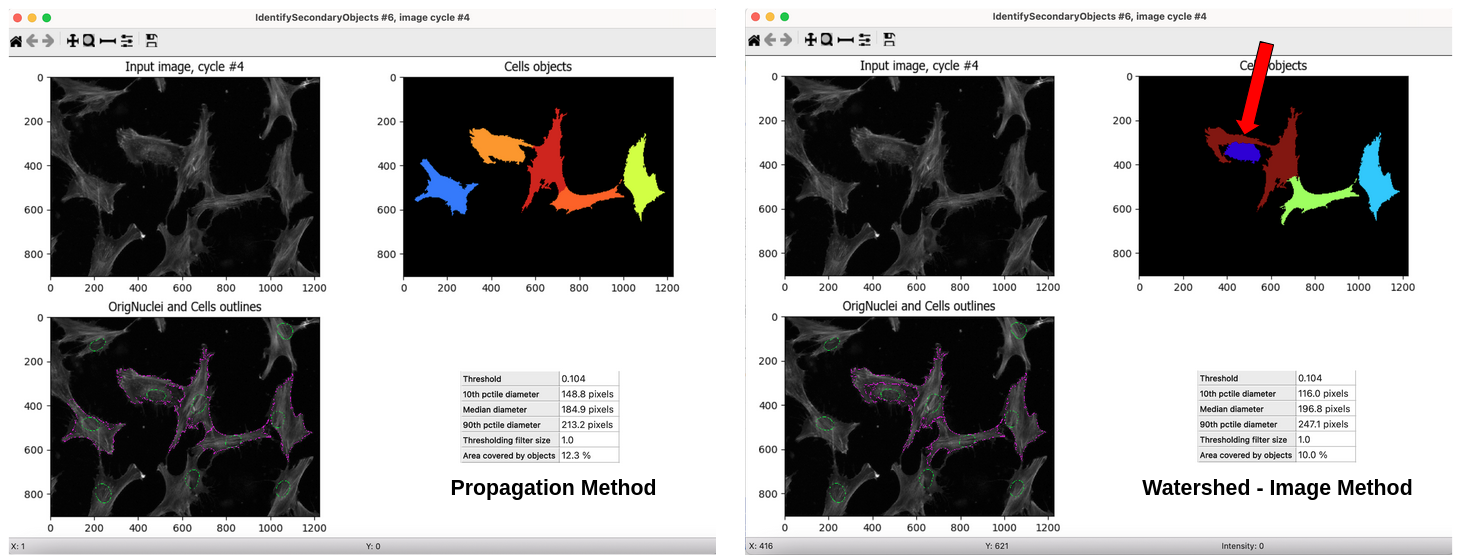
Figure 1. Comparison of methods for identification of secondary objects. This figure demonstrates how important the chosen method for identification is for cell segmentation. As you can see in the
Watershed -- Image method(right), it incorrectly segments the maroon-colored cell in the top right box by giving it a long arm (red arrow) that should be a part of a different cell. But, in thePropagation method(left), it segments the light orange-colored cell correctly and does not segment the cell next to it where it contains parts of the orange-colored cell.
But no matter what parameter you choose, there is always a “give and take”. For example, when choosing a value for the threshold correction factor (TCF), one value can segment one cell better than the other while the other value segments a different cell better (Figure 2).
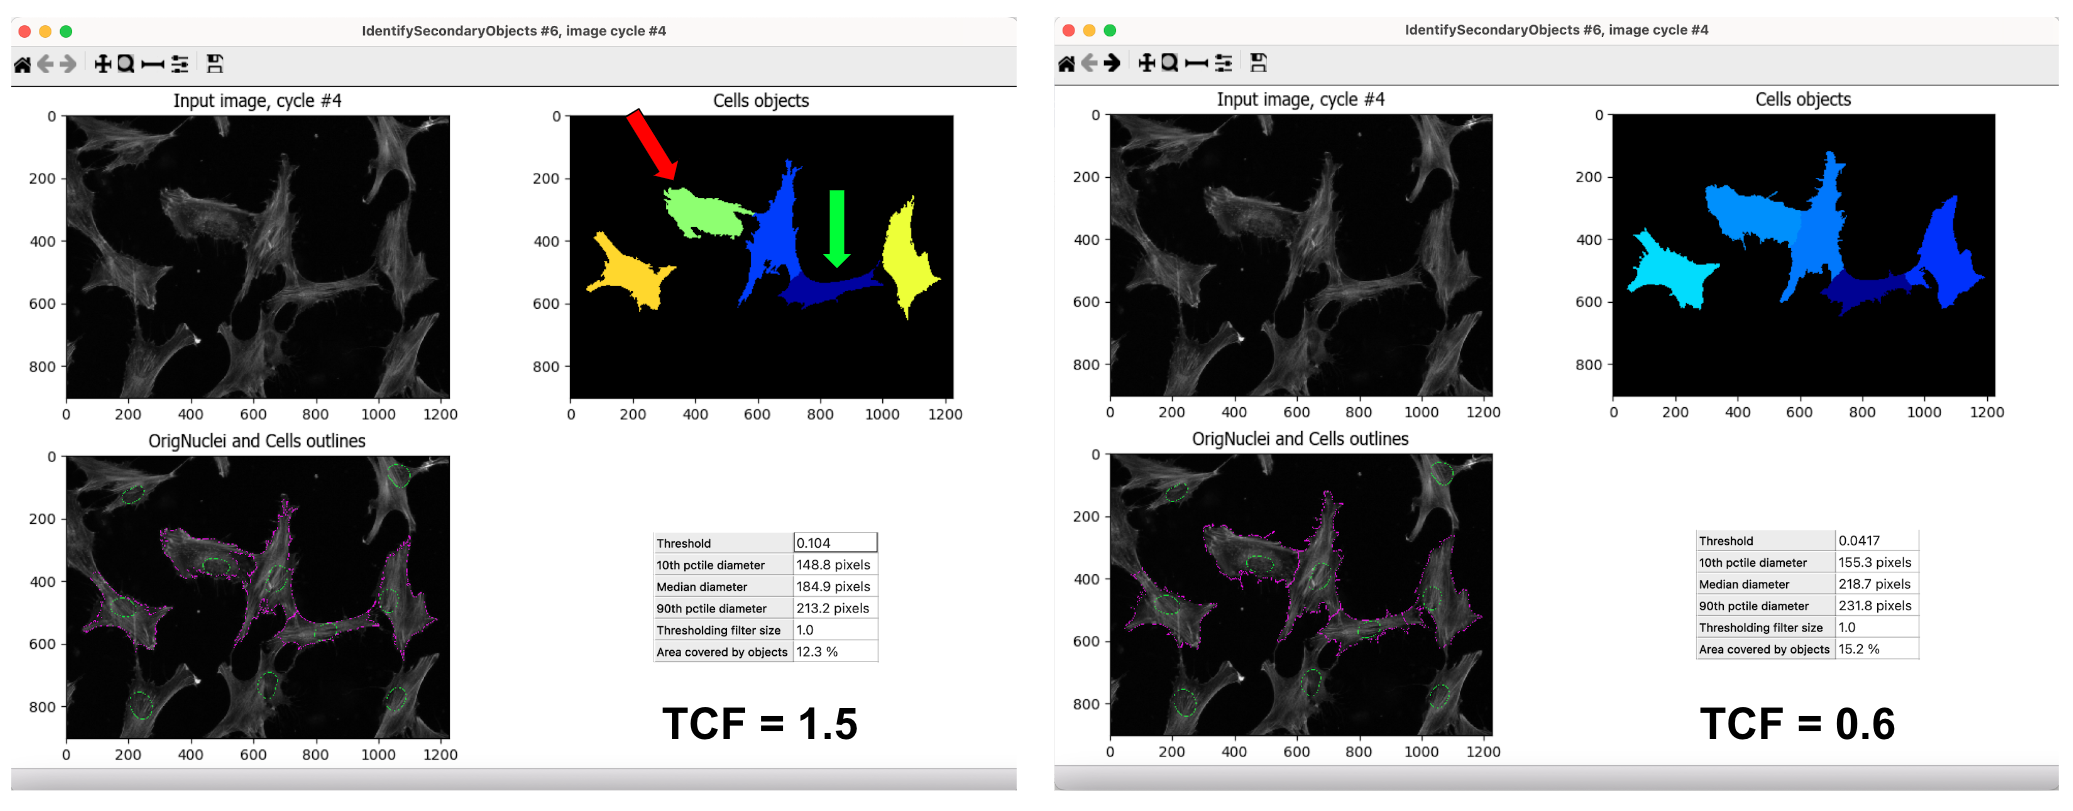
Figure 2. Comparison of threshold correction factor values (TCF). This figure shows how complicated picking a TCF value is to optimize segmentation. In the left panel, I set the TCF to 1.5, which segments the dark blue cell (green arrow) correctly but under segments the light green cell (red arrow). In the right panel, the TCF is 0.6, which segments the light blue cell (light green cell from the left panel) correctly, not leaving out any parts. In contrast, TCF=0.6 under segments the dark blue cell (same as the other panel), artificially adding some of its actin to the cell to its right. I used the same segmentation method for both panels.
As you can see, the main reason why this module is so hard is that it is very difficult to find the best parameters. But like with the IdentifyPrimaryObjects, this module is very easy to prototype and make changes to the parameters to get the best possible results.
Identifying tertiary objects (cytoplasm)
Lastly, the IdentifyTertiaryObjects module is the easiest to work with out of all the steps.
All you have to do is select the Cells object for the larger identified objects and the OrigNuclei (or however you called the objects from the IdentifyPrimaryObjects module) for the smaller identified objects.
Then, give the new tertiary object the name Cytoplasm, and you are done!
I believe that CellProfiler is a great segmentation option for my project. It did an amazing job segmenting the small stringy parts of the cells, which is likely to fully capture the cells’ morphology.
I will be using a CellProfiler pipeline for segmentation and feature extraction (hint, hint for the next blog post 😉). CellProfiler has many different parameters and methods to use, which makes it robust for multiple types of data sets. Segmentation is one feature of CellProfiler where it shines brightest.
Cellpose 2.0
Now it is time to talk about the software that cell image biologists have raved over all across Twitter.
Cellpose is a software that focuses on segmentation and is described as a “generalist algorithm”. It has a GUI that is very helpful for prototyping and can be implemented in Python.
Unlike CellProfiler, Cellpose does not have the ability to segment out multiple objects in one run. Instead, it provides different pre-trained models to perform segmentation for one specific object per run. For Cell Painting data, our lab decided on segmenting nuclei followed by whole cells (which we also call cytoplasm interchangeably).
The best part of Cellpose is, in my opinion, that only three out of all the parameters made a difference in my data (depending on the object that you are trying to segment). These are:
-
Cell Diameter (in pixels)
-
Flow threshold
-
Model
Cell diameter is so important because if set too large, it could over-segment objects (e.g. include background or merge cells). But set too small, it will incorrectly segment a bunch of small regions within the object instead of segmenting it whole. (Figure 3)
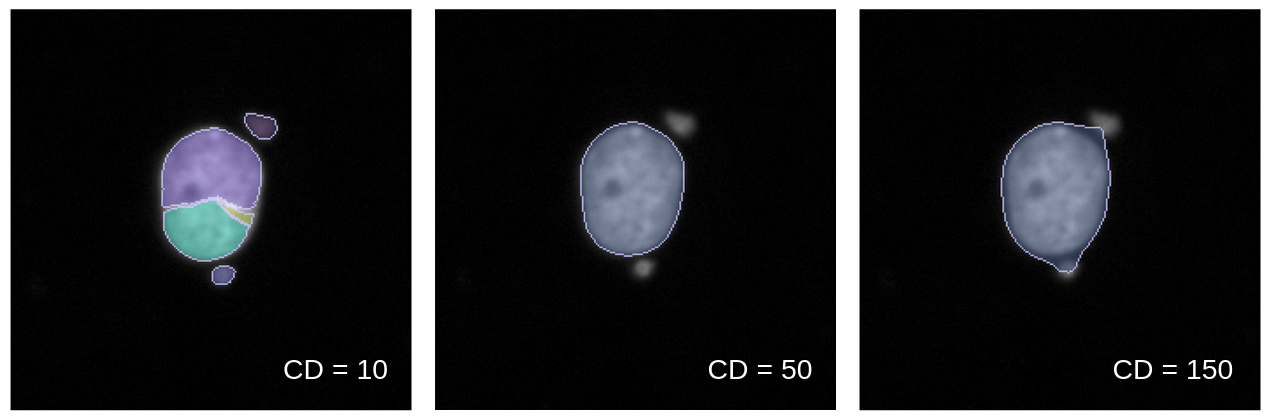
Figure 3. Comparison of cell diameter (CD) impact on segmentation. This figure demonstrates how CD values can make a big impact on how Cellpose segments nuclei. The left panel shows what happens when the CD is very low (segmenting nuclei into multiple parts) and the right panel shows what happens when the CD is very high (combining nuclei with other cells or artifacts). CD was the most important parameter that I toggled when optimizing nuclei segmentation.
There are multiple models that you can use for segmentation.
You can use any model, but the three models that I found most useful for my data were: nuclei, cyto, and cyto2.
During prototyping, I used each of these to see which segmented nuclei and whole cells better.
In the end, I found cyto worked best with nuclei and cyto2 worked best with whole cells.
As I was attempting to segment whole cells from my project, I noticed that Cellpose struggled when you only provided the actin channel. It could not determine where cells were since it did not have a nucleus channel to reference.
In Cellpose 2.0, there isn’t a way for you to load a group of images from multiple channels and use the nucleus channel as the base for segmenting other channels. You would need to create composite images (RGB) from each site to be able to reference the nucleus channel. That takes an extra step, which is what I have done in my code for segmentation. This function overlays the channels for every site to then use as an input for running Cellpose headless through Python.
As seen in Figure 4, Cellpose needs to have reference nuclei to accurately segment the cells in an image.
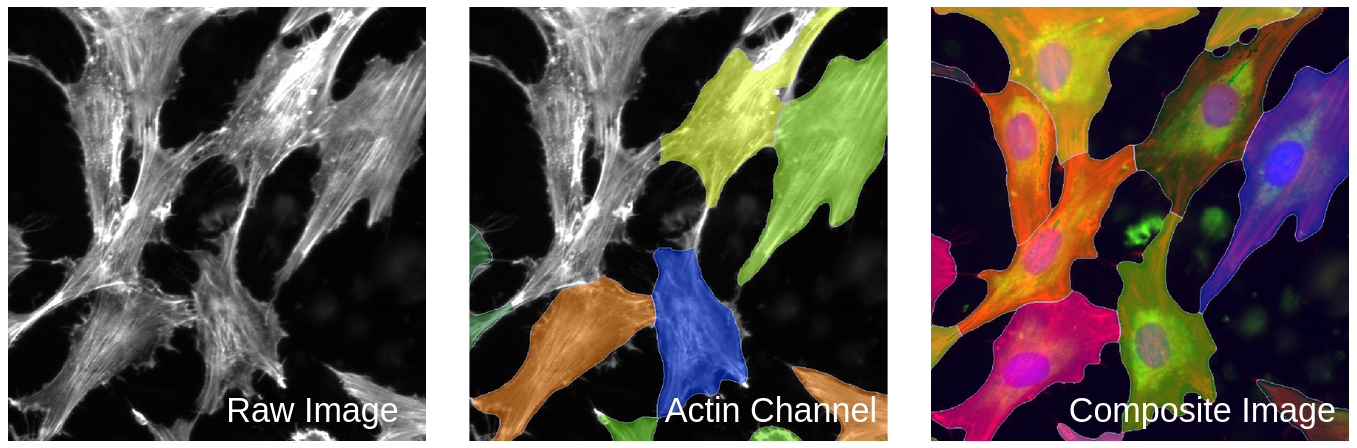
Figure 4. Segmentation comparison between one channel versus a composite image. This figure demonstrates the struggle Cellpose has with segmenting whole cells without reference nuclei. The middle image shows poor segmentation when lacking reference nuclei. When Cellpose has a composite image with all the channels, it is able to segment all of the whole cells and do it accurately (right).
As well, I like how Cellpose can use GPU to run over CPU, which is way faster and more convenient when prototyping. This enables me to simultaneously use my CPU power for other tasks while I have Cellpose running through my GPU. You will need to properly install PyTorch for this to work or it will run off of your CPU.
I really liked using Cellpose 2.0, mainly because there were fewer parameters for me to worry about, and it was very fast to prototype. I do wish that you could get outputs right from the GUI, but that is not necessary. For multiple projects within the lab, we use Cellpose 2.0 through Python to return center x and y coordinates for each cell in an image to use in analysis downstream. Unlike with CellProfiler, we do not use the GUI for running image analysis pipelines, but do use it for prototyping.
In all, I think that Cellpose is a great method for segmentation and has a lot of potential for use with diverse datasets with the ability to create your own models.
Cellpose Plugin for CellProfiler
Now, it’s the moment we have all been waiting for. Let’s talk about the Cellpose plugin for CellProfiler!
I had a lot of struggles with trying to get this to work on both my Linux computer and Macbook. I struggled to download CellProfiler from source, following many of the tutorials from the CellProfiler wiki on Github.
After all of my struggles, I was able to install CellProfiler from source and install this plugin on my Linux computer (unfortunately, my Macbook to this day still refuses to just download CellProfiler from source). After installation, it only took one additional simple answer. With the help of the amazing Beth Cimini, (she linked me to a part of the wiki that discussed setting CellProfiler plugin paths), I was able to use the plugin.
However, using the plugin came with an interesting challenge.
The challenge that I ran across was that my version of the runcellpose.py file was not displaying all the parameters that I saw on the version in the CellProfiler-plugins repository.
For the longest time, I believed that the file I downloaded onto my computer was the most up-to-date.
When I finally thought, “huh, maybe I should check my file and see what it looks like”, I came to the realization that the code in my file did not match what was on the latest Github version.
Now, how could that be?!
I have had that file downloaded since I first viewed the article about the plugin.
Well, if you go the article announcing the plugin, the link to the runcellpose.py file they provide is to the original one from 2021.
I had assumed that this link was to whatever file was up to date, but that was incorrect.
Once I downloaded the most recent version of the plugin and put it in the plugins folder, the module for the plugin in CellProfiler had every parameter and model that I would have in Cellpose 2.0 (Figure 5).
Figure 5. Cellpose 2.0 parameters available in the CellProfiler Cellpose plugin. This figure demonstrates that the most up-to-date plugin file does work in CellProfiler and provides parameters (YAY!).
Since I had so many issues with the install, and when you look up “Cellpose plugin for CellProfiler” on Google, it pulls up the forum post that does not give complete instructions, I have gone ahead and created a version-controlled document for how to install this plugin.
Now, let’s talk about some positives!
The one thing I really liked about this plugin is that it has a parameter called Supply nuclei image as well?.
As I stated in the Cellpose portion of this blog, you can only load one image at a time in the Cellpose GUI, so there is no way for it to be able to reference the nuclei channel.
But using the Cellpose plugin, the module comes with the innate ability from CellProfiler to use the nuclei channel that has already been loaded to use as the base for segmenting other objects within cells.
This is such a nice feature to have to avoid the extra step of needing composite images.
When I ran this module on my pilot data and used the parameter I mentioned above, I noticed in the segmentation output that this module actually overlays images to make a composite image (e.g. overlapping the nuclei channel and actin channel) (Figure 6)
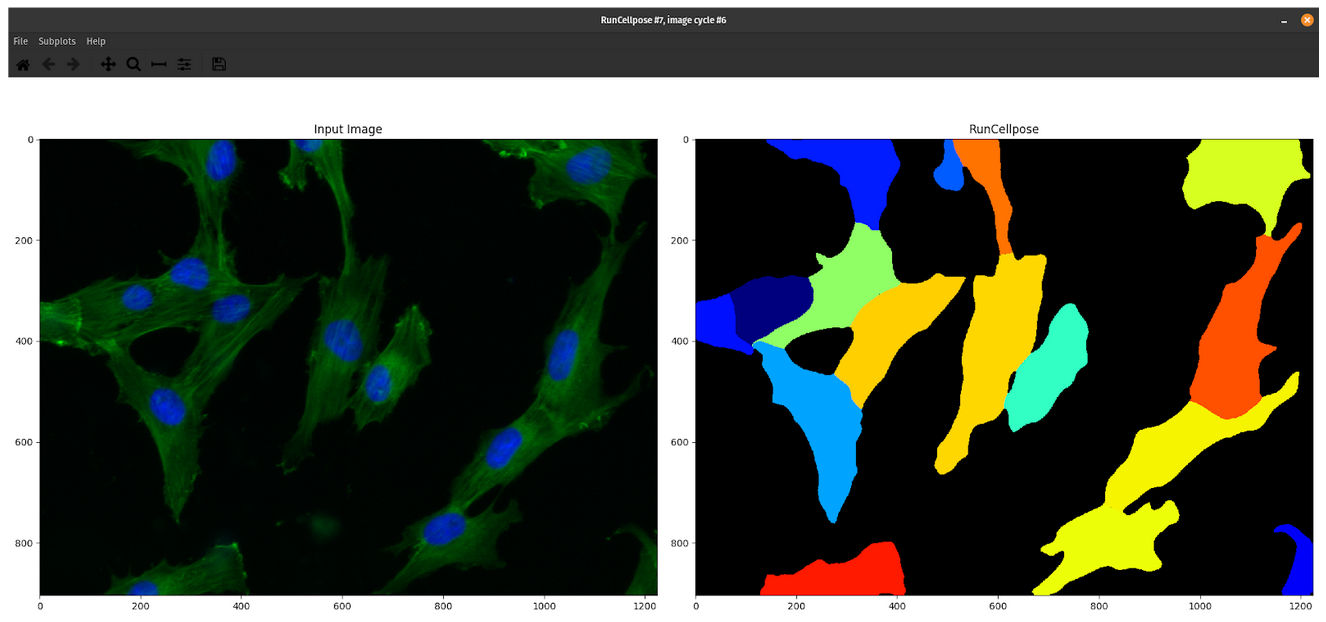
Figure 6. Output from the CellProfiler Cellpose plugin using the nuclei image parameter. This figure demonstrates how the CellProfiler Cellpose plugin overlays channels when the parameter is selected. On the left, when using the
Supply nuclei image as well?parameter, CellProfiler will overlay the nuclei (in blue) and actin channel (in green) for the module to use when segmenting.
This differs from the functionality that CellProfiler uses for standard segmentation, where you use the already derived nuclei objects from the previous module when segmenting the whole cells.
I will discuss the consequences of this later on when I compare all the methods together.
The main test I wanted to do was to make sure that whatever segmentation this plugin outputs is the same as the Cellpose 2.0 output when given the same exact parameters. I found that there is no difference between the two visually (Figure 7).
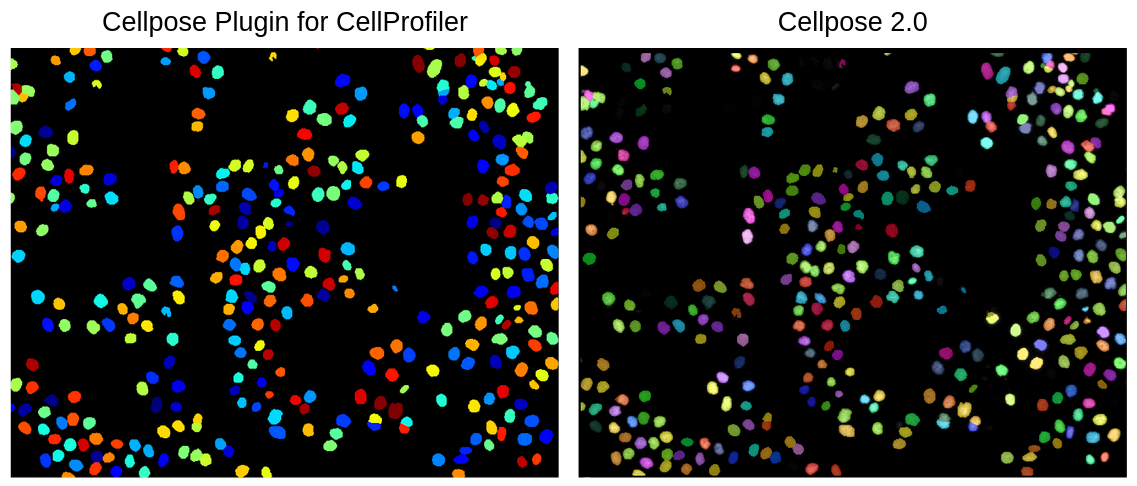
Figure 7. Comparison between the CellProfiler Cellpose plugin and Cellpose 2.0. This figure demonstrates when using the same parameters for both methods, the segmentation is the exact same visually.
This means that I am fully confident in being able to replicate the same segmentations that I got when running a pipeline with Cellpose 2.0 in a pipeline that uses the CellProfiler Cellpose plugin as the segmenting method.
Proposed Improvements for CellProfiler Cellpose Plugin
One thing that I noticed right off the bat is that this module did not have (but needed!) is a way to remove objects/cells/nuclei that had pixels that touched an edge of the image. This is a function that is already in place in the CellProfiler standard method and in the Cellpose pipeline. I use for all my CellProfiler projects, and I thought it would be a good idea to add it to the CellProfiler Cellpose plugin!
As you can see in the PR I made for CellProfiler, I was able to take one of the utility functions already in Cellpose, which removes objects that touch the edges, and added it to the module to allow the option for users.
After all of this, I believe that this plugin is a great option for Cellprofiler users to have the ability to choose what type of segmentation method they want to use. I am excited to be able to use this and to help with the improvement of the module!
Comparison of the three methods
One of the biggest differences I noticed between Cellpose and CellProfiler was that Cellpose segmentations did not fit the shape of the cells as much as CellProfiler. As well, CellProfiler included more of the stringy parts of the actin that Cellpose did not (Figure 8).
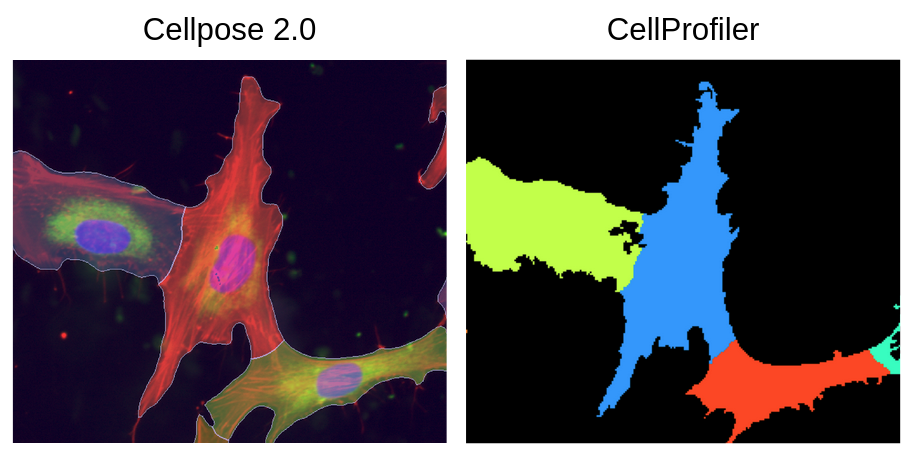
Figure 8. Comparison of sensitivity between Cellpose and CellProfiler. This figure shows how CellProfiler segments cells much tighter and includes small parts compared to Cellpose. Cellpose segments cells more broadly and includes more of the background compared to CellProfiler.
After doing a lot of prototyping with both CellProfiler and Cellpose, I believe that Cellpose segments whole cells much better (e.g. no cell is segmented over each other) than CellProfiler, even though it is less sensitive. (Figure 9).
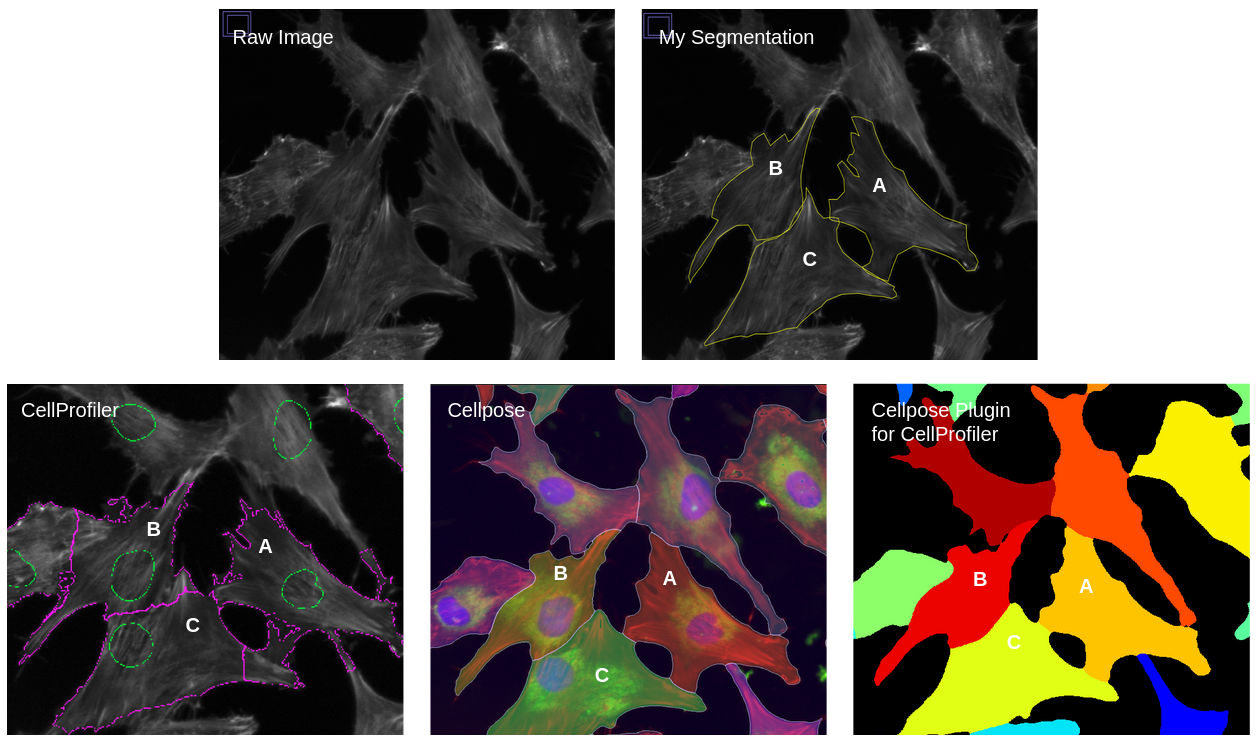
Figure 9. Evaluation of whole cell segmentation. This figure shows the comparison between my manual segmentation, CellProfiler segmentation, Cellpose segmentation, and CellProfiler Cellpose plugin segmentation. The segmented cells from Cellpose and Cellpose plugin match my manual segmentation while the CellProfiler segmentation is very far off and looks to overlap other cells. Also, the Cellpose plugin segmentation matches that of the Cellpose plugin since both use composite images to perform segmentation (though for Cellpose I use 3 channels and the Cellpose plugin only uses 2 channels).
I think I have explained enough about how CellProfiler and Cellpose are both great in their own ways, but I want to finally discuss one of the biggest issues that I have with the Cellpose plugin compared to the other two methods.
As I said earlier, the CellProfiler Cellpose plugin does not use any nuclei objects from a previous module to find whole cells. This means there is currently no way to match any nuclei with their respective cytoplasm/whole cell.
What I believe this plugin should be able to do is remove any nuclei associated with a cytoplasm that has pixels touching an edge of the image. For the Cellpose method, in the projects within the lab, we created custom Python functions to make sure that any nuclei that fall in between a cytoplasm is included and any cytoplasm without nuclei is gotten rid of.
With that being said, it is also good to keep in mind that the CellProfiler Cellpose plugin does not automatically connect different objects. This will impact downstream processing and analysis since you won’t be able to, for example, connect the cells to their nuclei without additional customization (e.g. create custom Python functions, etc.).
In all, I think that the CellProfiler Cellpose plugin would work much better if it included the CellProfiler method of using segmented nuclei as the base for segmenting the whole cells or to add functionality that can connect the cytoplasm to their respective nucleus (or nuclei). This will be a project that I will be pursuing in the future!
Conclusion
After all of the prototyping, I have come to one conclusion: All these segmentation methods are good! They are all very easy to use and seem to work well by eye. It is yet to be seen if these subtle segmentation differences that I discussed will impact cell morphologies and the subsequent biology that we discover (e.g. biomarkers for gene deficiency).
I will be using all of them for various projects and not one of them is substantially better than the other. They each have their pros and cons that I have talked about, where you can easily decide which one will be best for your project (Table 1). I highly recommend prototyping with each of them before deciding for yourself.
I hope that my testing has helped you and I will be seeing you next time when I go over feature extraction methods!
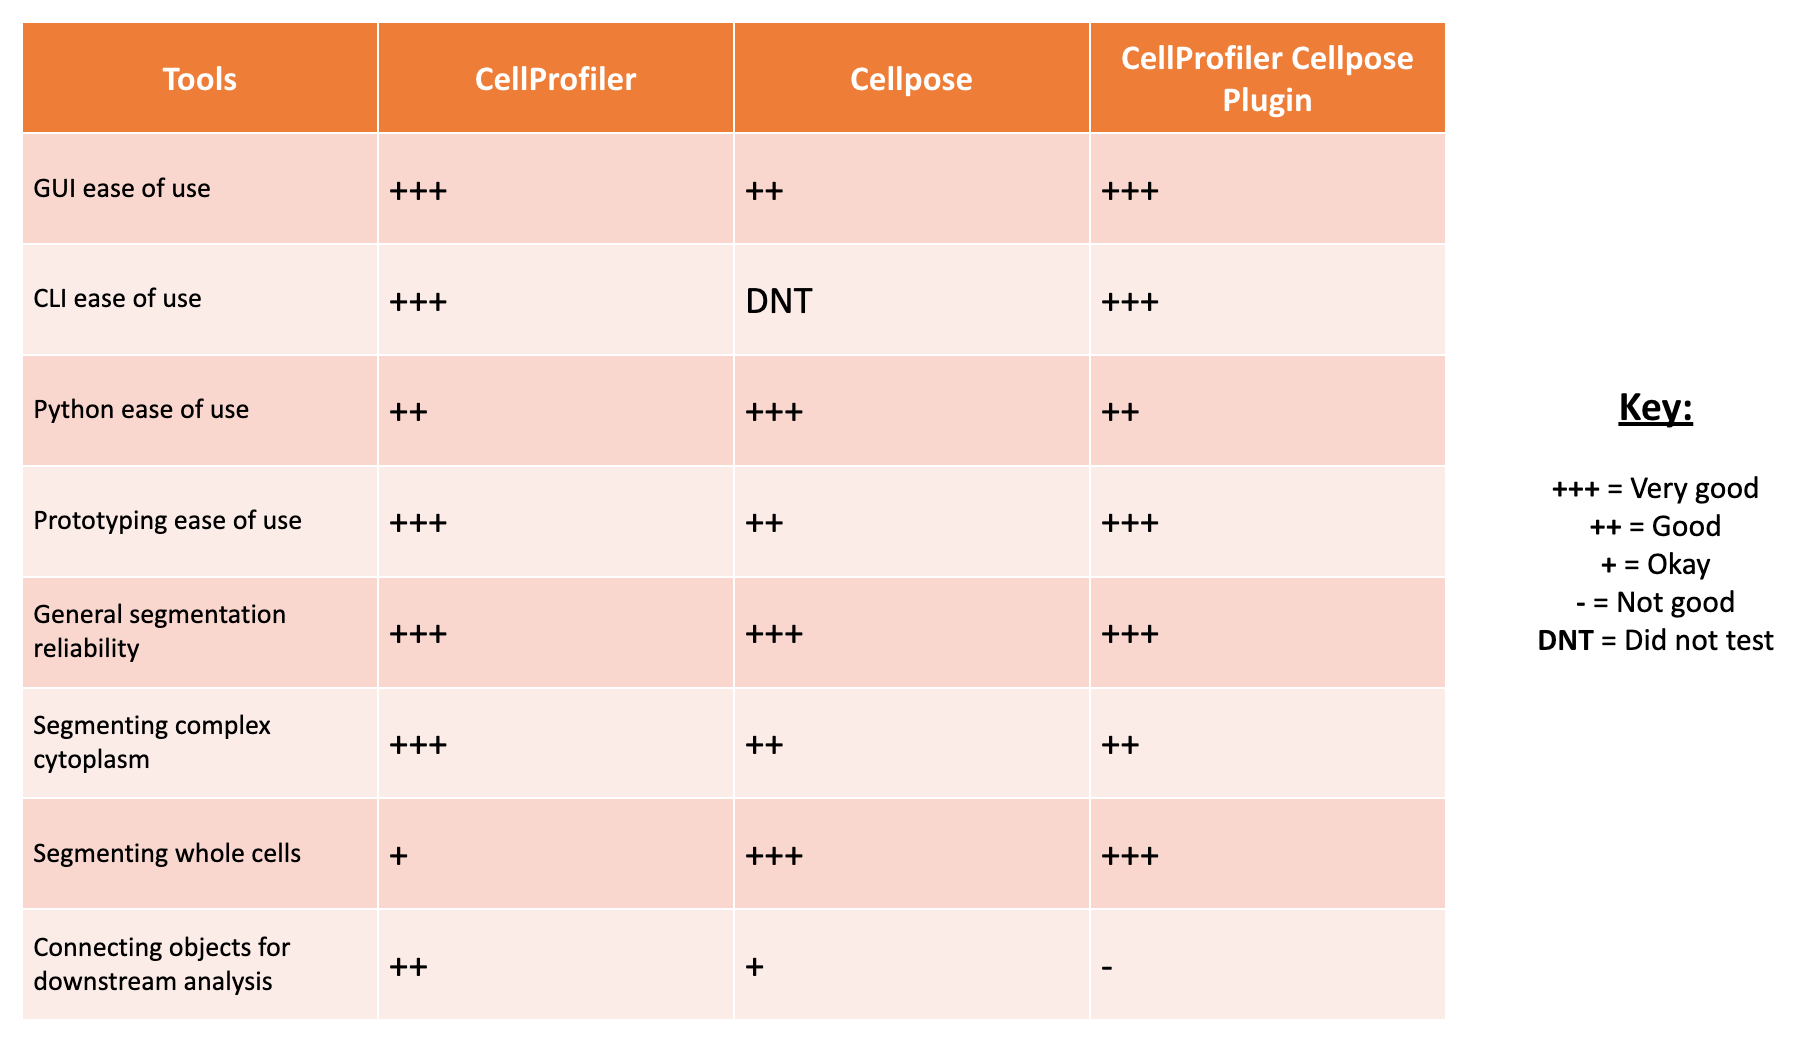
Table 1. Pros and cons between segmentation methods.
Previous post
GitHub Strategy for Open Science
Next post
Steps for Performing Illumination Correction in Microscopy Images