Illumination Correction Made Easier
Illumination Correction: A Comparison of Methods
For anyone new to cell-image analysis (like me!), let me preface this blog post with the fact that no matter how good a method is, nothing will ever be “perfect.”
In this field, the main goal is to try and minimize any issues within the images that you have. Examples of issues include blurry/noisy images, imperfect segmentation, uneven illumination (the main point of this blog), among others. Being able to interpret if the method you chose worked is up to the scientist’s discretion. But, one thing to understand is that the concept of a method working or being the correct answer is often unknown, elusive, or flat-out not satisfying.
As an example, for a project that I am working on with a fellow lab member, we have been struggling with finding the best segmentation method for our data. We have determined that the correct answer to us means that our segmentation method will incorrectly segment a small percent of the cells but correctly segment the majority. It is really a game of give-and-take when working with image analysis.
Knowing this, I will go into three different methods of illumination correction and give the pros and cons for each. I tested these methods for my current project, with the goal of predicting NF1 genotype from Schwann Cell morphology.
What is illumination correction and why is it used?
Illumination correction (IC) is the method of adjusting the lighting within a collection of images so that the lighting is evenly distributed across the image (no dim or bright spots). Depending on the microscope (i.e., sensors) images that are taken of cells/tissues could come with a multitude of issues. The main issue that IC helps is when the image contains a brighter area in the center that gradually becomes dimmer moving away from the area. This type of issue, called “vignetting”, requires a computational method that will take the image and change it to where the whole image has even lighting throughout the image.
But why do we care that there is more lighting in one part of the image than the rest? It can’t do that much harm, can it?
Well, having illumination issues will make further analysis downstream harder or biologically inaccurate. One example of a downstream pipeline that is negatively impacted by illumination issues is feature extraction, where software measures different features (i.e. texture, size, area, etc.) for each of the cells in an image. If a group of cells are brighter than others in an image, the features of the cells from the brighter group could be interpreted as different from other groups when these cells have close to the same features in reality.
Our goal is to minimize the effect of uneven lighting (or other errors like artifacts) on the biology we ultimately want to analyze. When running pipelines to find morphology features that distinguish, for example, cells with different genotypes (i.e. finding biomarkers), then the correction of these illumination errors is pertinent for the most accurate results. Like I said at the start, nothing is “perfect”, but this correction can help to make the results better than using the raw images.
Methods of Illumination Correction
There are many ways to correct for illumination in multi-cell images, and not all of them will be covered in this post. The data I am using to test these methods are fluorescence microscopy images, specifically Cell Painting. The three methods that I am focusing on are:
- BaSiCPy (also called PyBaSiC or PB): https://github.com/peng-lab/BaSiCPy
- CellProfiler (or CP): https://cellprofiler.org/
- CIDRE: https://github.com/smithk/cidre
These methods are all different in their approach and how they are accessed/used.
All of these use a “retrospective” approach, which can derive an illumination correction function using the images directly. In contrast, a “prospective” approach requires that during the image acquisition stage that a dark image (background without light) and bright image (background with light) must be taken at each site. These images then can be used to derive an illumination correction function. This means that any package or software that uses this approach would be applied at the beginning of the experiment which isn’t always feasible. This is what makes the retrospective approach much better since you can use it on publically-available data and do not need to make the image acquisition step longer (it’s more convenient).
In this post, I created the pros and cons based on what I have researched and then my own personal experiences using these methods as seen in Figure 1.
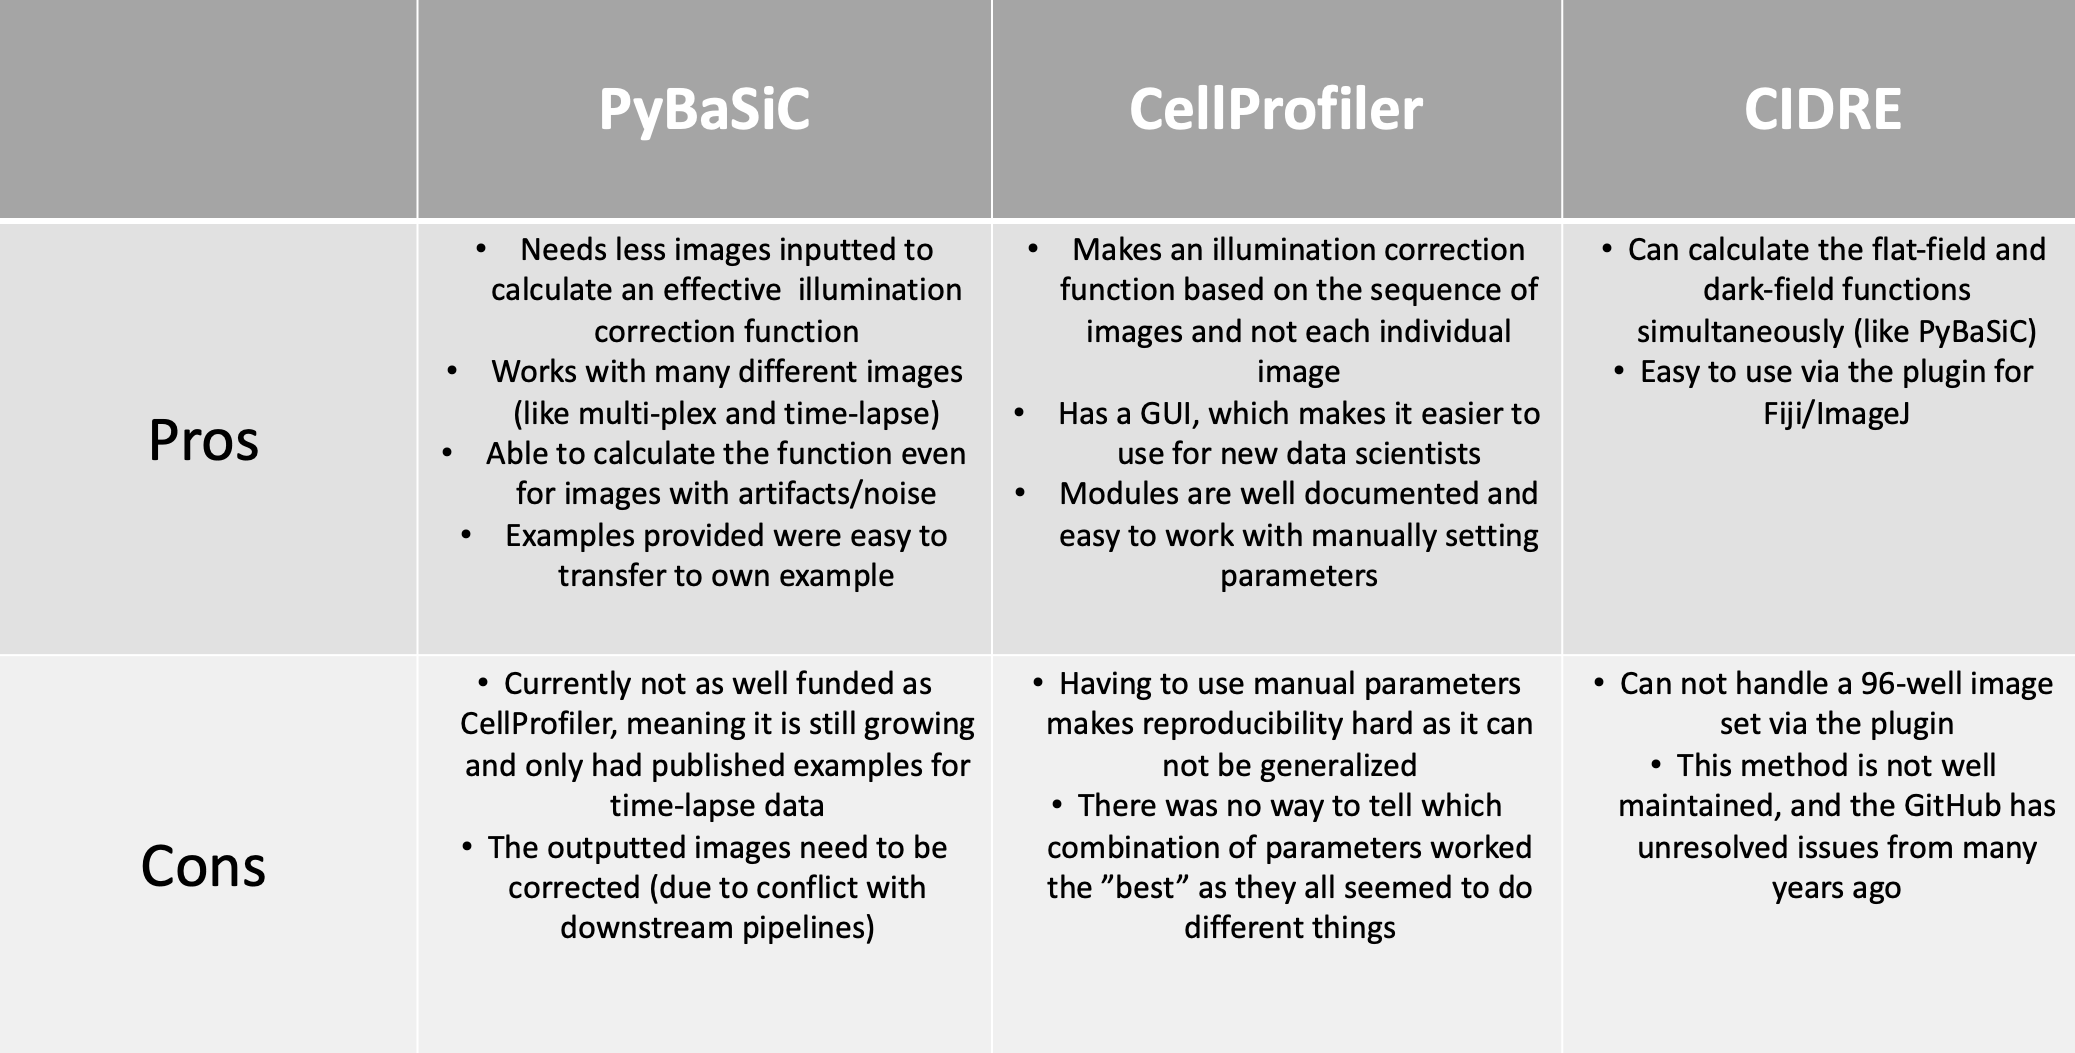
Figure 1. Table of Illumination Correction Methods
Let’s go through each of these methods one by one:
CellProfiler
I started off my research with CellProfiler (CP). Whenever I searched for illumination correction methods, this software came up first. The main way that it is used is through the GUI (graphical user interface). There are ways to utilize CP through Python and Jupyter notebooks (see https://github.com/CellProfiler/notebooks), but the most recent examples are from 2-5 years ago.
Side-note: If you aren’t familiar with the coding world, it is important to know that software changes frequently and can become out of date even after less than a year. Please use that resource I provided with a grain of salt as it very well could be out of date or work perfectly!
Back to the GUI, CP 4.0 has a very user-friendly interface that makes it easy for non-data science biologists to use as well as data science beginners. But this comes with a not-so-fun challenge that impacts generalizability, which is manual parameters (I know, terrifying!).
Now, a few manual parameters are fine within a software, like if you need to make minor corrections to fit the function to your data, but too many manual parameters creates many avenues for confusion and error. When it comes to CP illumination correction, it has MANY manual parameters (ranging from 5 to 15 depending on the method you choose). As a beginner in the field, how are you meant to know which threshold to use or if the correction should be run based on all images or per image? That is my main issue with CP. It is set up to be easy to use for beginners, but you need to be an expert to use it properly.
There is documentation on the modules and parameters that can help with trying to understand the IC function you are creating. The things that CP does better than the other two methods are that it makes loading in and downloading the corrected images easy, and you can test-run your pipeline to make corrections. It is also nice when software has its own method of saving instead of having to troubleshoot. As well, CP works like a Jupyter Notebook where you can test each module and figure out any issues instead of running the full pipelines.
I believe this software can be used effectively when you put a lot of time into research and investigate as many examples as possible to find the best combination of parameters. But I also believe that after all the time I put into understanding CP, I am still left with doubt in all my pipelines and don’t feel comfortable using them for my current project.
PyBaSiC
The next method I used is PyBaSiC, which took a lot less time to implement but took the most time with troubleshooting. PB is a Python package that runs illumination correction on many different image types (i.e. timelapse and multi-plex). The PB GitHub provides three different example pipelines that work with timelapse data, but none for multi-plex. Conveniently, the workflow is the exact same.
I was able to take from the examples, load in my images, and produce illumination corrected images (see https://github.com/WayScience/NF1_SchwannCell_data/blob/main/1_preprocessing_data/PyBaSiC_Pipelines/Illumination_Correction.ipynb). Even though it was so easy, the hardest part was the fact that the package did not have a saving function.
I was able to ask the developers on GitHub (see https://github.com/peng-lab/BaSiCPy/issues/91) what the best form of saving the images was and developers answered within a week, which was great! This package is very well-maintained and since it is newer, that means that it can only improve.
I did find however that I struggled with figuring out the format of what my new images were converted into (i.e. 32-bit, 64-bit, etc.), which is important for the next pipeline step (segmentation) (that I will discuss in a future blog post). One of the positives for this method in the context of a new biologist in this field is that the “correct_illumination” and “basic” function already have established parameters, which seems robust for a variety of use cases, that you do not need to change. For more information on how PyBaSiC compares with other illumination correction methods (spoiler alert, it seems to work WAY better) or to learn the math behind how it calculates the flatfield and darkfield functions for correction, you can read the BaSiC paper.
For PyBaSiC, the only thing you need to toggle is loading in the images and the best way to save your newly corrected images. Depending on your project, maybe the format of the corrected images is fine for your next steps, but in other cases you might need to convert them to 8-bit or 16-bit.
For my project, I implemented a fellow lab member’s code, where he converted the corrected images to 8-bit when using this method. I needed to use this conversion because downloading the images as-is (without conversion) was causing multiple errors during my downstream processes. It is important to know that you will likely have to retrace your steps back to previous pipelines, like IC, when issues need to be corrected or to be improved. In all, I believe this method is the most efficient and easy to work with to perform illumination correction.
CIDRE
Lastly, I checked out the Fiji/ImageJ plugin called CIDRE. I don’t have a lot to say about it since when I used it with my image set of 96 images, it came up with an error. After further investigation, it was an error that was found back in 2018 that has not been solved. Though, from an outsider’s perspective, this could seem like the developers abandoned the project, but this might not be true.
I have started to understand the challenges of maintaining open-source software through my position. To all those that do, I thank you for your hard work!
It is unfortunate that I could not test this method to determine how well it worked with my images. I have determined that this method, though referenced a lot during my research on the topic, has not been improved upon and likely not a valid option for illumination correction at this current time. I will investigate this method in the future and I hope to see it be improved upon!
Conclusion
Based on this information I have provided, I hope that this guides you in the right direction for your illumination correction pipeline. There are many other software/packages/methods that can be used to do illumination correction, but it takes time to figure out the “right” one.
For the needs of my current project, I chose PyBaSiC! The package is written in Python (which is interoperable with our current data analysis ecosystem), requires no manual parameters for determining the illumination correction function, is faster to run, and is easy to work with as a new computational biologist. We have yet to determine the impact of this method of illumination correction on the downstream cell morphology readouts, but we plan to test these empirically in the near future (and describe results in a blog post of course! 😉).
If I find and investigate any other methods, I will update this blog to provide information and opinions on them.
Supplementary
To view the progress being made with the NF1 Schwann Cell project, you can go to the GitHub repository to view each pipeline and rationale.
For the CellProfiler pipelines, I tested various manual parameters on the dataset and compared how these illumination correction functions compared to each other using an image that contained a large artifact. See the CellProfiler Prototyping repository on GitHub for more information.
Previous post
Microscopy data playbook
Next post
GitHub Strategy for Open Science